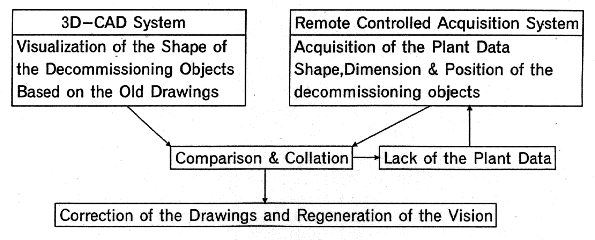
Fig. 1. Concept of data correction by
REDAS system.
Takeo Mimori, Yukio Iwasaki and Kazuo Tanaka
1Japan
Atomic Energy Research Institute (JAERI)
2-4, Aza-Shirane, Shiraoka,
Tokai-mura, Naka-gun, Ibaragi-ken 319-11, Japan
2 Mitsubishi Heavy
Industries, Ltd.(MHI)
3-1, Minatomirai 3-chome, Nishi-ku,Yokohama 220,
Japan
ABSTRACT
JAERI has been developing the remote controlled plant data acquisition system as a part of the technology improvement program for decommissioning of nuclear facilities sponsored by the Science and Technology Agency.
Decommissioning procedure planning of nuclear facilities has to be based on the latest and exact plant data. But sometimes the latest data could not be constructed from the design drawings if long years had been passed after the construction and some modifications have been done after the start of operation. So the work of the data acquisition for the configuration and dimensions of facilities. Especially the development of remote controlled plant data acquisition system is necessary for the decommissioning procedure planning of the high radiation area because of the difficulty of the accessibility to the area.
JAERI has developed the remote controlled plant data acquisition system which use the small mobile robot equipped with ITV and laser range finder from 1992. This system has been planned to apply to the JAERI's reprocessing test facility(JRTF).
Remote plant data acquisition system consists of three sections, mobile section, vision section and control section. Vision section is composed of the TV cameras and the laser range finder, and be able to collect the pictures of the object and the data of its location and distance.
In the decommission engineering, remote controlled plant data acquisition system is used to check the differences between actual plant image and 3D-CAD plant data based on the old drawings by comparing the ITV image of the actual plant and the plant view based on the 3D plant data. If some difference is found, the additional plant data is collected by the system and update to the latest data. After the update of 3D plant data, these data is used to the decommission engineering.
JAERI has performed the data acquisition function tests combined with the 3D-CAD system in 1995. In the tests, we have collected the fundamental data of the synchronous comparison between the ITV view from the robot and the 3D view.
From the test results, it seems that the precision of the view comparison is enough to distinguish the differences between the actual plant and the 3D plant data. Also, the precision of the measuring function is enough for the adjustment of the large equipment data. But the improvement of the precision is necessary for the adjustment of the small piping route.
We will test this system in the plant model of the JRTF and evaluate the performance, the efficiency and the restriction of system. This system will be developed to apply the actual decommissioning works of the JRTF.
INTRODUCTION
Decommissioning procedure planning of nuclear facilities has to be based on the latest and exact plant data. But sometimes the latest data could not be constructed from the design drawings if long years had been passed after the construction and some modifications have been done after the start of operation. So the work of the data acquisition for the configuration and dimensions of facilities. Especially the development of remote controlled plant data acquisition system is necessary for the decommissioning procedure planning of the high radiation area because of the difficulty of the accessibility to the area.
JAERI has been developing the remote controlled plant data acquisition system(REDAS) as a part of the technology improvement program for decommissioning of nuclear facilities sponsored by the Science and Technology Agency from 1992. REDAS has been planned to apply to the JAERI's reprocessing test facility(JRTF). REDAS use the small mobile robot equipped with ITV and laser range finder.
Outline of the system configuration are introduced. And the test results for 3-dimensional measurement of the mock-up model are described here.
DEVELOPMENT OF REDAS IN JRTF
In the JAERI's reprocessing test facility (JRTF), the latest data has to be updated for the decommission engineering because of the several modifications after the construction. So the development of remote controlled plant data acquisition system is necessary for the decommissioning procedure planning.
JAERI has developed the remote controlled plant data acquisition method by which use the REDAS system small mobile robot equipped with ITV and laser range finder. The plant data will be updated by the comparisons between the actual plant data and the 3D-CAD data of the old drawings and the decommission engineering will be performed by these updated data. The flow of the system is shown in Fig.1.
REDAS system has been made in 1992 and 1993. The mobile function tests and the data acquisition function test has been performed in 1994. Combination test between REDAS and the 3D-CAD system has been performed in 1995.

Fig. 1. Concept of data correction by
REDAS system.
CONSTITUTION OF REDAS
Design condition of REDAS shown in Table I has been decided from the environmental condition of JRTF.
REDAS consists of mobile section (see Fig. 2) and control section. Mobile section consists of driving mechanism and visual attachments. Driving mechanism has the two pair of legs with assist wheel in front side and rear side. Each leg has 2 joints (knee & hip). 2 driving wheels are equipped at the center of the body of driving mechanism. Visual attachments for plant data acquisition consist of ITV cameras for normal view and for close-up view, laser range finder and light. Vision attachments are able to rotate to any direction by the pan and tilt mechanism.
Control section (see Fig.2) consists of control panel, computer and monitor. This section is used for the control of mobile section, operation of the driving mechanism and the visual attachments, setting of the mobile condition, surveillance and measuring of distance and self position.
In the control section, the measurement of the relative distance function and the measurement of the self-position function has been equipped. The absolute coordinate value of self-position of REDAS has been calculated from the relative distance between the self position and base points (more than 3 points) whose absolute coordinate values was precisely known. Flow of the measurement of the position is shown in Fig. 3.
Table I Design Condition of REDAS
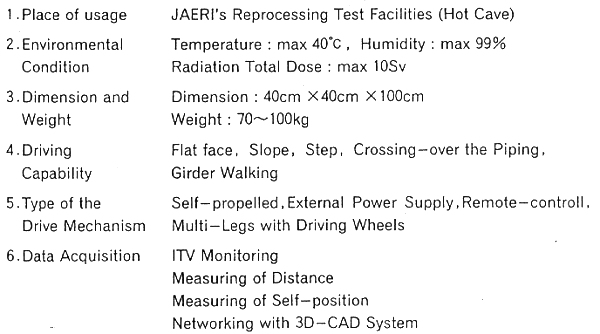
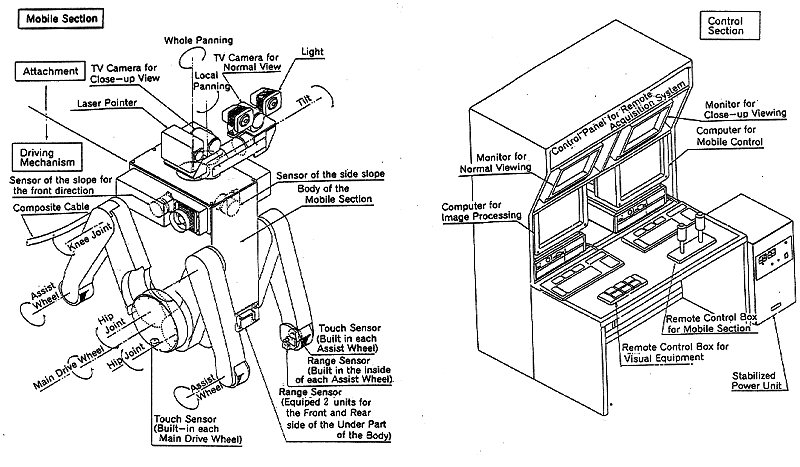
Fig. 2. Outline of REDAS.
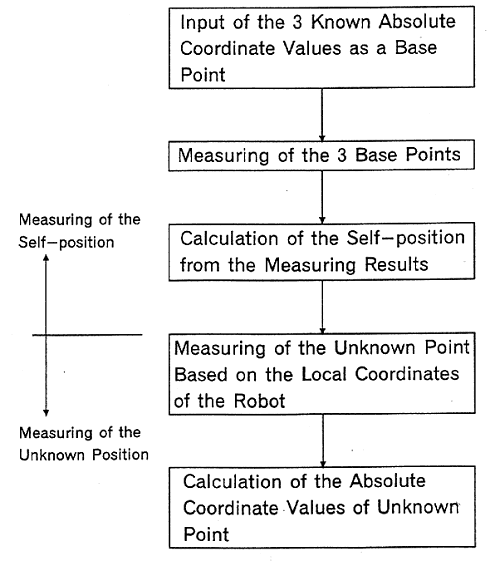
Fig. 3. Flow of the measuring
absolute coordinate value.
SEPARATE FUNCTION TEST OF REDAS
After the end of the assembling of REDAS, the following items have been performed as a function test of REDAS in 1994 separately.
Design conditions has been confirmed by the test results.
COMBINATION TEST WITH 3D-CAD
The 3D-CAD data is verified by the comparison between the ITV view and the 3D-CAD view from the same camera position. Differences in dimension or location found by the comparison are corrected by the laser range finder in REDAS. System block diagram of the REDAS and 3D-CAD is shown in Fig. 4. For the confirmation of the function of the data correction, the combination test with 3D-CAD has been performed in 1995. Test items are as follows.
In the comparison test, the mock-up model simulated the shape of the JRTF piping and equipment has been built. ITV camera view has been compared with the 3D-CAD model view based on the 3D-CAD data of the mock-up model.
From the results of the comparison function tests, Major differences between ITV view and 3D-CAD view from the same camera position calculated by the REDAS has been detected.
In the 3D-CAD data correction tests, we have verified the precision of the measurement for the two items below.
Precision of the location has been affected by several error factor, such as the installation error of the mock-up model, error for the coordinate values of base point for the self-position identification and so on. But the measurement results has enough precision for the correction of the 3D-CAD data for the decommissioning engineering.
Dimensions of the flat face has been calculated from the coordinate values of two end points. The dimension of the curved surface such as cylinder or sphere, has not been calculated from the coordinate values of the end point because of the reflecting limitation of the laser range finder. To measure the diameter of the curved surface, new measuring method has been considered.
The scale of the ITV view reflecting the two end point has been calculated from the distance between camera and the object, and from the zoom angle value of the ITV camera. And the distance between two end point on the ITV view has been converted by multiplying the scale between the ITV view and the actual model.
The error for the distance has been several percent in the test. It has confirmed that the measurement results has enough precision for the correction of the 3D-CAD data.
The real mock-up model (wire frame model) and the 3D-CAD data(solid model) based on the distance and location measured by REDAS has been compared in Fig. 5. Minor difference has been existed, but the whole 3D-CAD data has agreed with the mock-up model.
SUMMARY AND FUTURE WORK
Basic data for the correction function of three-dimensional data has been accumulated from the combination function test between REDAS and 3D-CAD system. From the test results, it seems that the REDAS and 3D-CAD system has the feasibility for applying the data acquisition at the JRTF.
The improvement of the precision and the operability will be continued for the computer software. We planned to apply REDAS to the JRTF and to test the correction function. We expect that the applicability and the improving point will be evaluated by these tests.
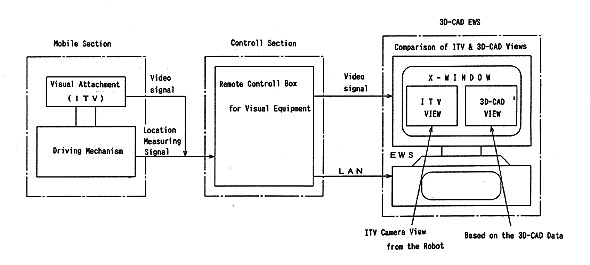
Fig. 4. System block diagram of the
REDAS and 3D-CAD.
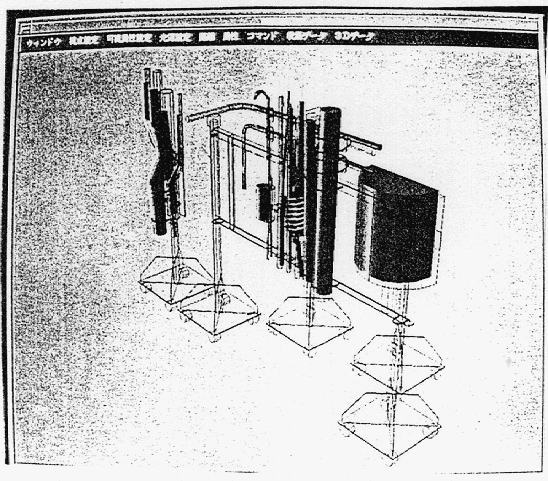
Fig. 5. Comparison between ITV